Manuscript
Introduction
Main
- Open Android Studio. Decribe that it is the standard IDE choice. Create an empty project. Briefly mention what an Activity is, along with the xml layout.
- Create simple activity (Choose Empty activity)
- Briefly explain the package system in Android Studio
- Say that we use Gradle instead of Maven, as it is Googles' top choice
- Explain the Android Manifest
- Explain Activities and onCreate() (App Structure And Components)
- Say that we now need to create a layout for our activity
- Explain the UI builder
- Explain layouts and layout controls (Common View Controls), (View Layout)).
- Update the MainActivity layout. It will display an input text field and a button. Mention that Linear and Relative are the most popular ones. Also mention FrameLayout
- Show use of match_parent and wrap_content, as well as difference between horizontal and vertical.
- Show use of gravity and layout_gravity (parent container) and explain difference
- Switch to RelativeLayout and experiment with match_parent and wrap_content
- Show relational parameters (below, left of)
- Say that we prefer to use RelativeLayout for Complex layouts, but that you can nest layouts as well
- Connect the layout to our Activity with setContentView() and explain the use of R
- Run Hello World app and explain debugging. Mention that we need either an emulator or a device. If you have a device, don't forget to enable developer options
- Add hook for onResume() and onDestroy(), and add log statements
- Run the app and show the different states
- Connect view elements in Java code
- Create a click listener for the button. This is where we want to initiate the search. For now, add a Toast, and run the app.
-
ASSIGNMENT 1A It's time for the first assignment. Open Wiki in browser, and say that this contains all info needed. Menu on the right hand side.
Enter the assignments page. Describe the task (create a Twitter like app), then describe the backend. Finally, describe assignment 1A.
PAUSE WHILE PARTICIPANTS DO ASSIGNMENT 1A - Replace the Toast with an Intent which we will use to start the TracksActivity. Describe intents
- Create the TracksActivity. TracksActivity will perform the actual search, and display a list containing the search results. Add entries to the Android Manifest
- Start TracksActivity from MainActivity, and also pass the search input as an extra. Retrieve the bundle in TracksActivity.
- Explain that we now want to set up a service for performing the search. Explain AsyncTasks ( Working In the Background.)
Say that for this course we will use Retrofit, and provide Retrofit basics (background thread, GSON, etc).
Retrofit is a library for turning your Rest API into a Java Interface.
It handles moving the network call into a background thread, parsing JSON with GSON, and returning the result to the UI thread.
compile 'com.squareup.retrofit2:retrofit:2.0.2'compile 'com.squareup.retrofit2:converter-gson:2.0.2' - Add SpotifySearchService which is the Retrofit interface. Maybe live code this. Also, add URL as a final variable to the MainActivity.
https://api.spotify.com"/v1/search" Call<TracksResponse> search(@Query("q") String query, @Query("type") String type);(type="track")- Create the TrackResponse object and explain its connection to the JSON structure returned by the Spotify API. It will hold a Tracks object, which in turn will hold a list of items
- Create the Tracks object, which will contain a list of Track. Copy this
- Create the Artist and Track domain objects. Copy these
- Create an instance of Retrofit, and use this to instantiate the SpotifySearchService.
- Run the app and perform a search. Add a Toast to the success callback, and also log if success or error. Remember to log error
- Do not add internet permission until app has run and failed. Explain the need for permissions
- Run app again and see that the Toast pops up
-
ASSIGNMENT 1B Describe assignment 1B (Sending messages using Retrofit).
PAUSE WHILE PARTICIPANTS DO ASSIGNMENT 1B / SWITCH PRESENTER - Remove
Toastand explain that we now want to display the data in a list -
Explain that a
RecyclerViewcan be used for displaying the results ( Lists and RecyclerView)RecyclerView
RecyclerView is a subclass of ViewGroup. It displays a list of child View objects, one for each item in your list of items. If you have 100 items in the list, the RecyclerView will only create e.g. 12 views, just enough to fill the visible part of the screen. When you scroll, it will reuse these views and just update the data inside them - it recycles views over and over.
ViewHolders and Adapters
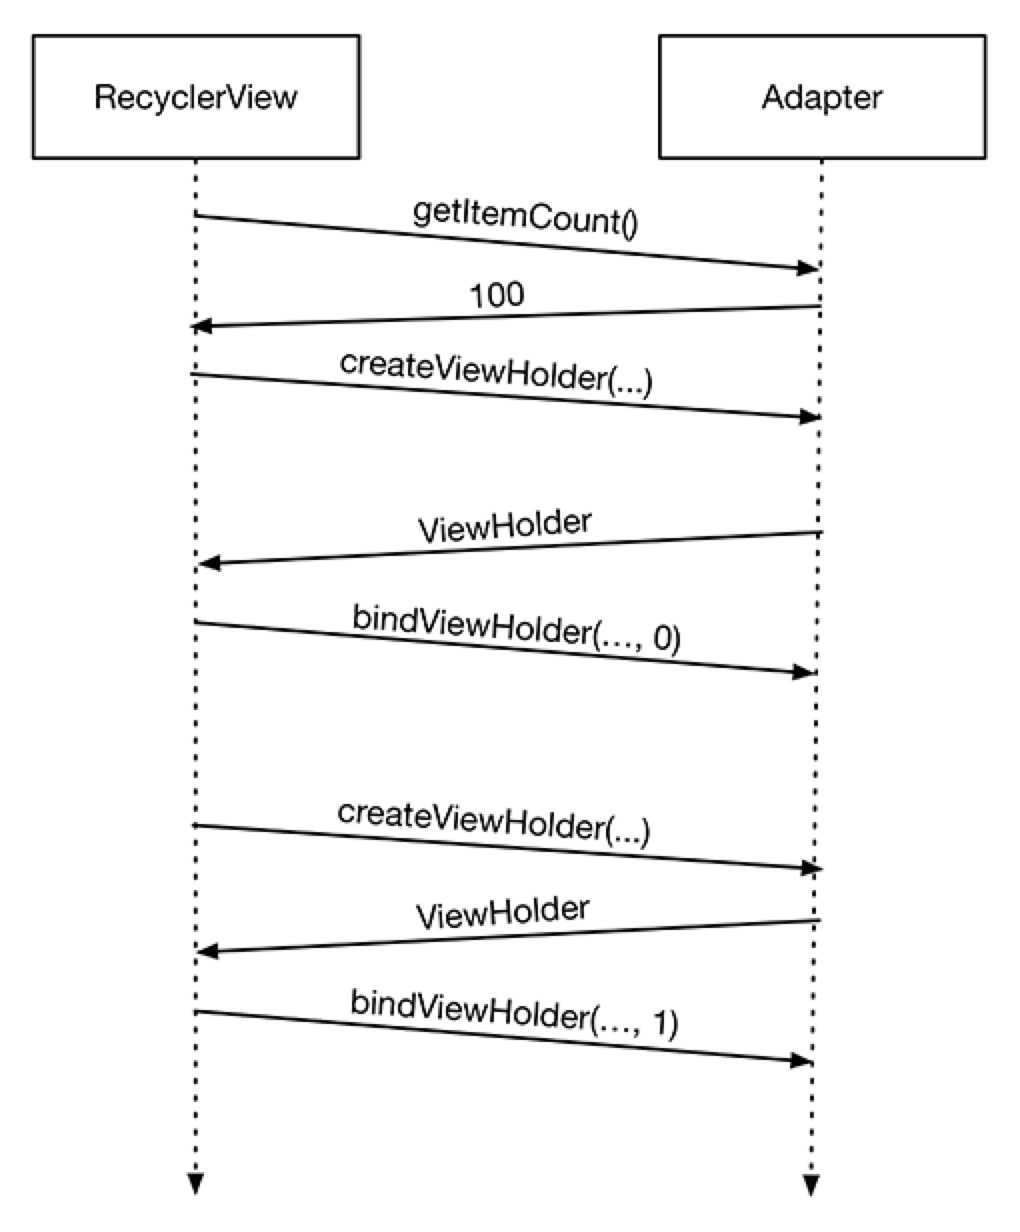
RecyclerView only recycles views and positions them on screen. To create the views we will use a RecyclerView.Adapter subclass and a RecyclerView.ViewHolder subclass. The ViewHolder only does one thing: Hold on to a view and subviews inside it. The RecyclerView does not create these ViewHolders itself, instead it asks an Adapter to create them. The Adapter is responsible for creating the necessary ViewHolders and then populating them with data for each item. RecyclerView first asks the Adapter how many items it has using getItemCount(). Then it wants to create the view holder using createViewHolder(). Finally it wants to bind the data for this item using bindViewHolder(). It then repeats this for all the items in the list.
- Describe how lists work with a layout for each row. In our example we will have a layout displaying the track and artist name
- ListView was previous standard, but because of performance issues Recyclerview is the new standard. Describe briefly difference between ListView and RecyclerView. Use list of 100 elements, and 10 visible as example
- Add the recyclerview in tracks_activity.xml. android.support.v7.widget.RecyclerView
- When binding the recyclerview to Java code, first set the Layoutmanager. This is used to telling how to dipslay data.
- When setting the adapter, say that the adapter will be used for creating layout for each row, setting data and recycling data.
- Create Arraylist with tracks. Create constructor for Tracksadapter with this list and the context
- Remove toast in retrofit success callback and clear the tracklist and add all new tracks. Remember to notify adapter.
- Create a TracksAdapter with an inner static view holder class. Describe that ViewHolder holds views and subviews, and that adapter creates as many ViewHolders that are visible to screen. Adapter populates and updates data in each ViewHolder. ListView would create views for each row.
- The TracksAdapter needs a reference to a List of tracks and a Context (for creating layout inflater).
- Create a layout for each track, item_track.xml. Add two textviews, one for artist another for track name.
- Implement onCreateViewHolder, and describe what it does
- Implement onBindViewHolder, and describe the reuse of views
- Set the item count
- Test app.
- Set onclicklistener on the view in view holder. Notify activity via a delegate interface.
- In TracksActivity, create implicit intent with action view and uri.parse(href). Check with packageManager if activity for intent exists. startActivity(intent).
- Describe the rest of the assignments.
- Quick break. We will be here to assist you
An activity can be seen as a controller in an MVC pattern.
    It is a single focused screen the user can interact with. It is responsible for creating a view, and coordinating interaction and state.
    An application typically has multiple Activities, and during use, switches between them
    An activity goes through a life cycle, and we have hooks where we can perform operations at given states. First is onCreate()
LinearLayout: Positions element either in a single row or column, based on orientation.
        Can adjust and move elements by using the gravity property
        Relative Layout: Positions elements relative to each other or the parent container.
         Position is controlled by positioning attributes
 The R file is a generated file that hold references to all resources in your app.
        These are resources souch as images and drawables, layout files and strings
Intents are Android's way of communicating between components such as Activities and Services. We can use intents to launch activities and
            pass data between them.
            Explicit Intents: Explicitly declare which activity to start
            Implicit Intents: Declares an action to start, which allows components listening for this action to respond to it.
            An example is when you want to open a location in Google Maps in Chrome.
            You are then presented with the option to open Maps in either the Maps app or the browser.
            This is possible as both of the apps are listening for the intent in their declared intent filter.
            Intent filters describe which types of implicit intents can be received.
             Another example is to switch out stock SMS app
<uses-permission android:name="android.permission.INTERNET" />compile 'com.android.support:recyclerview-v7:+'
MainActivity
public class MainActivity extends ActionBarActivity {
    private Button searchButton;
    private EditText searchInputView;
    @Override
    protected void onCreate(Bundle savedInstanceState) {
        super.onCreate(savedInstanceState);
        setContentView(R.layout.activity_main);

        searchButton = (Button) findViewById(R.id.search_button);
        searchInputView = (EditText) findViewById(R.id.input_view);

        searchButton.setOnClickListener(new View.OnClickListener() {
            @Override
            public void onClick(View v) {
                String input = searchInputView.getText().toString();
                Intent intent = new Intent(MainActivity.this, TracksActivity.class);
                intent.putExtra("input", input);
                startActivity(intent);
            }
        });
    }
}<RelativeLayout xmlns:android="http://schemas.android.com/apk/res/android"
xmlns:tools="http://schemas.android.com/tools" android:layout_width="match_parent"
android:layout_height="match_parent" android:paddingLeft="@dimen/activity_horizontal_margin"
android:paddingRight="@dimen/activity_horizontal_margin"
android:paddingTop="@dimen/activity_vertical_margin"
android:paddingBottom="@dimen/activity_vertical_margin" tools:context=".MainActivity">
<EditText
android:layout_width="match_parent"
android:layout_height="wrap_content"
android:id="@+id/input_view"/>
<Button
android:layout_width="wrap_content"
android:layout_height="wrap_content"
android:text="@string/search_button_text"
android:id="@+id/search_button"
android:layout_below="@id/input_view"
android:layout_centerHorizontal="true"
android:layout_marginTop="15dp"/>
</RelativeLayout>Retrofit SpotifySearchService
public interface SpotifyService {
    @GET("/v1/search")
    Call<TrackResponse> searchForTrack(@Query("q") String input, @Query("type") String type);
}
Retrofit adapter = new Retrofit.Builder()
.setEndpoint("https://api.spotify.com")
.build();
SpotifyService spotifyService = adapter.create(SpotifyService.class);TrackResponse, Track and Artist classes
public class TrackResponse {
    private Tracks tracks;

    public Tracks getTracks() {
        return tracks;
    }

    public void setTracks(Tracks tracks) {
        this.tracks = tracks;
    }
}
public class Tracks {
private List<Track> items;
public List<Track> getItems() {
return items;
}
public void setItems(List<Track> items) {
this.items = items;
}
}
public class Track {
    private String name;
    private List<Artist> artists;
    private String uri;

    public String getUri() {
        return uri;
    }

    public void setUri(String uri) {
        this.uri = uri;
    }

    public List<Artist> getArtists() {
        return artists;
    }

    public void setArtists(List<Artist> artists) {
        this.artists = artists;
    }

    public String getName() {
        return name;
    }

    public void setName(String name) {
        this.name = name;
    }
}
public class Artist {
private String name;
public String getName() {
return name;
}
public void setName(String name) {
this.name = name;
}
}RecyclerViewAdapter
Adapter for displaying the search results in the RecyclerViewpublic class TracksAdapter extends RecyclerView.Adapter<TracksAdapter.TrackViewHolder> {
private final List<Track> tracks;
private final Context context;
private final ClickedTrackListener listener;
public TracksAdapter(Context context, ClickedTrackListener listener, List<Track> tracks) {
this.tracks = tracks;
this.context = context;
this.listener = listener;
}
@Override
public TrackViewHolder onCreateViewHolder(ViewGroup viewGroup, int i) {
View itemView = LayoutInflater.from(context).inflate(R.layout.item_track, viewGroup, false);
final TrackViewHolder trackViewHolder = new TrackViewHolder(itemView);
itemView.setOnClickListener(new View.OnClickListener() {
@Override
public void onClick(View v) {
Track track = tracks.get(trackViewHolder.getPosition());
listener.clickedTrack(track);
}
});
return trackViewHolder;
}
@Override
public void onBindViewHolder(TrackViewHolder trackViewHolder, int i) {
Track track = tracks.get(i);
trackViewHolder.trackName.setText(track.getName());
}
@Override
public int getItemCount() {
return tracks.size();
}
public static class TrackViewHolder extends RecyclerView.ViewHolder {
private final TextView trackName;
public TrackViewHolder(View itemView) {
super(itemView);
trackName = (TextView) itemView.findViewById(R.id.trackName);
}
}
}<?xml version="1.0" encoding="utf-8"?>
<LinearLayout xmlns:android="http://schemas.android.com/apk/res/android"
android:orientation="vertical" android:layout_width="match_parent"
android:layout_height="match_parent">
<TextView
android:layout_width="wrap_content"
android:layout_height="wrap_content"
android:id="@+id/trackName"/>
</LinearLayout>TracksActivity
public class TracksActivity extends ActionBarActivity implements ClickedTrackListener {

    private RecyclerView trackList;
    private List<Track> tracks = new ArrayList<>();

    @Override
    protected void onCreate(Bundle savedInstanceState) {
        super.onCreate(savedInstanceState);
        setContentView(R.layout.activity_tracks);

        trackList = (RecyclerView) findViewById(R.id.trackList);
        trackList.setLayoutManager(new LinearLayoutManager(this));
        final TracksAdapter tracksAdapter = new TracksAdapter(this, this, tracks);
        trackList.setAdapter(tracksAdapter);

        Bundle extras = getIntent().getExtras();
        String input = extras.getString("input");

        RestAdapter adapter = new RestAdapter.Builder()
                .setEndpoint("http://ws.spotify.com/")
                .build();
        SpotifyService spotifyService = adapter.create(SpotifyService.class);

        spotifyService.searchForTrack(input, new Callback<TrackResponse>() {
            @Override
            public void success(TrackResponse trackResponse, Response response) {
                tracks.clear();
                tracks.addAll(trackResponse.getTracks());
                tracksAdapter.notifyDataSetChanged();
            }

            @Override
            public void failure(RetrofitError error) {
                Toast.makeText(TracksActivity.this, "Failure", Toast.LENGTH_SHORT).show();
                Log.e("search", "error", error);
            }
        });
    }

    @Override
    public void clickedTrack(Track track) {
        Intent intent = new Intent(Intent.ACTION_VIEW, Uri.parse(track.getHref()));
        startActivity(intent);
    }
}<RelativeLayout xmlns:android="http://schemas.android.com/apk/res/android"
xmlns:foo="http://schemas.android.com/apk/res-auto"
xmlns:tools="http://schemas.android.com/tools" android:layout_width="match_parent"
android:layout_height="match_parent" android:paddingLeft="@dimen/activity_horizontal_margin"
android:paddingRight="@dimen/activity_horizontal_margin"
android:paddingTop="@dimen/activity_vertical_margin"
android:paddingBottom="@dimen/activity_vertical_margin"
tools:context="no.bekk.liverpool.TracksActivity">
<android.support.v7.widget.RecyclerView
android:layout_width="match_parent"
android:layout_height="match_parent"
android:id="@+id/trackList">
</android.support.v7.widget.RecyclerView>
</RelativeLayout>{
"info": {
"num_results": 1,
"limit": 100,
"offset": 0,
"query": "\"godset fra drammen\"",
"type": "track",
"page": 1
},
"tracks": [
{
"album": {
"released": "2008",
"href": "spotify:album:7nrjbBpy8yrueDbKCBY6Ef",
"name": "2 x femogførr",
"availability": {
"territories": "AD AR AT AU BE BG BO BR CA CH CL CO CR CY CZ DE DK DO EC EE ES FI FR GB GR GT HK HN HR HU IE IS IT LI LT LU LV MC MT MX MY NI NL NO NZ PA PE PH PL PT PY RO SE SG SI SK SV TR TW US UY"
}
},
"name": "Godset fra Drammen",
"popularity": "0.36",
"external-ids": [
{
"type": "isrc",
"id": "NOFFM0897080"
}
],
"length": 258.786,
"href": "spotify:track:67jdp9WXPR3ihTic9WXwmG",
"artists": [
{
"href": "spotify:artist:4AiqdizfguNQoWQ5N6Aaza",
"name": "C-laget"
}
],
"track-number": "8"
}
]
}